TVIPS cRED
Module: cred_tvips
This module can be used for cRED/SerialRED data collection using a TVIPS camera. It can be enabled by adding the cred_tvips module to the modules section in the settings.
Instamatic communicates with EMMENU to start and stop image acquisition. EMMENU must be running before instamatic is started. In EMMENU the correct camera profile should be selected (one with shutterless acquisition) before data collection is started. A navigator (.nav) file can be given to enable serial data collection on a large number of crystals.
Data are stored to the directory specified in the Data i/o dialog. Each new experiment is saved to a new directory, and previous data are never overwritten. Images are stored in .tiff format and experimental metadata are to cRED_log.txt
The python script process_tvips.py can be used to convert the data to MRC or SMV format, with input files for REDp (.ed3d) and XDS (XDS.INP).
Data collection was tested and developed on a JEOL 1400 with F416 camera.
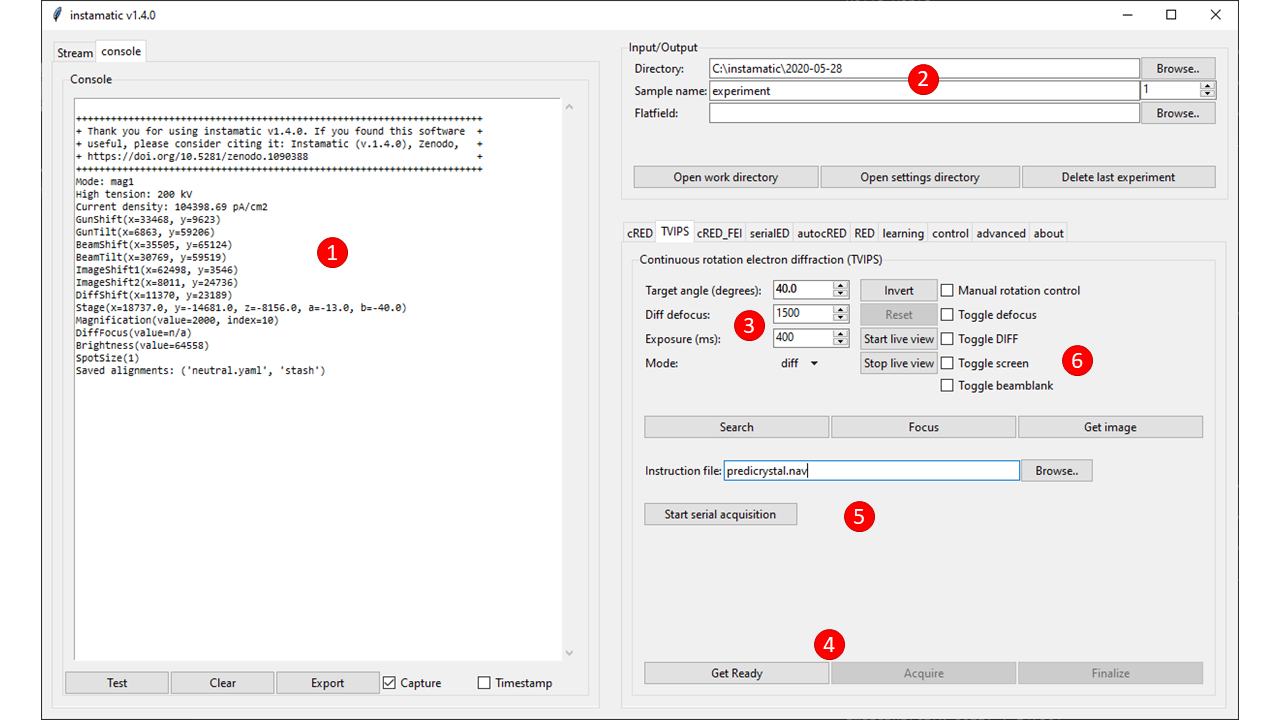
1. Console window
Shows the program output, see: Console.
2. Input/output
Contronls where the data are stored. For more information, see: Data i/o.
3. Experimental parameters
- Target angle
- The angle the goniometer should rotate to starting from the current angle. Pressing invert will invert the angle (i.e. 40° to -40°).
- If you check Manual rotation control, the target angle will be blanked and instead the rotation is controlled manually (e.g. via the panel or foot controls).
Instamaticwill then automatically terminate the experiment once it notices that rotation has stopped. - Diff defocus
- This is the defocus value to apply to the diffraction focus. This is used to quickly toggle to a view of the crystal without toggling the mode, which may introduce not refocus to the same position because of lens hysteresis. Check the Toggle diff defocus box to toggle between the focused/defocused mode. Pressing Reset will return to the original value.
- Exposure
- The exposure time for each frame in milliseconds. Ideally, this should be set so that a single frame covers ~0.2-0.3°, but the added overhead from the camera should also be taken into account.
- Mode
- Select the mode to collect data in, e.g. to do continuous real space tomography.
4. Start/stop the experiment
These are the controls to collect a cRED data set from a single particle. To prepare the TEM for acquisition, press Get Ready. This will move to the right angle, turn off the beam blank, start the live view in EMMENU, etc. There will be a message once the TEM is ready.
Press Acquire to start the acquisition. The TEM will rotate to the specified angle, and automatically stop once finished. Pressing Finalize will unlock the interface so a new experiment can be started.
5. Start serial acquisition
This button starts a serial acquisition using the instruction file given below. Once started, it can only be interrupted by pressing Ctrl-C in the terminal.
The instruction file must be a .nav file compatible with SerialEM.
Data will be collected at every position with the Acquire flag set.
6. Other controls
- Toggle DIFF
- Toggles between diffraction (DIFF) and mag (MAG1) mode.
- Toggle screen
- Moves the fluorescent screen up/down.
- Toggle beamblank
- Toggle the beam blank. If the beam is blanked when the experiment is started, it will automatically unblank and re-blank afterwards.
- Start live view
- Start the live view in EMMENU.
- Stop live view
- Stop the live view in EMMENU.
- Search
- Switch the microscope to search mode. Internally, these are defined as
instamaticscripts and can therefore be easily modified. The parameters of the search mode are defined in$instamatic\scripts\search_mode.py, for example to put the screen down, unblank the beam, and switch to MAG1 mode:
ctrl.screen.down()
ctrl.beam.unblank()
ctrl.mode.set('mag1')
- Focus
- Switch the microscope to focus mode. The parameters of the search mode are defined in
$instamatic\scripts\focus_mode.py, for example to put the screen up, blank the beam, and switch to DIFF mode:
ctrl.screen.up()
ctrl.beam.blank()
ctrl.mode.set('diff')
- Get Image
- Acquire and store a single image. It will be available in the EMMENU image buffer.